Administering the Broker
The standalone Artemis MQ server includes a web server and Artemis Console for direct monitoring and operations. However, when embedded in a Java application, the console is unavailable. The following steps will help re-enable and attach external HawtIO or Artemis Console to the JMS Bridge.
Since the Artemis Console is a set of plugins built on HawtIO, the steps to connect and enable it are the same, with additional steps for building the console described below.
Jolokia
Section titled “Jolokia”Jolokia is a JMX-HTTP bridge that provides an alternative to JSR-160 connectors. Among various installation methods, a Java agent-based installation is supported, and the required startup flags are already included in the JMS Bridge startup script.
Installation
Section titled “Installation”Download Agent
Section titled “Download Agent”Download the latest version of the Jolokia agent from the Jolokia Maven page and place it in the JMS Bridge jars directory: JMS_BRIDGE_ROOT/share/java/jms-bridge/.
Set Environment Variables
Section titled “Set Environment Variables”Before starting the JMS Bridge, set the environment variables for Jolokia Port and Host: JOLOKIA_PORT and JOLOKIA_HOST. Both variables must be set for the agent to be enabled.
JOLOKIA_HOST must be resolvable from HawtIO/Artemis Console; it cannot be set to localhost if connecting from a remote machine using the jms-bridge-vm1 hostname.
HawtIO
Section titled “HawtIO”HawtIO is a modular web console for managing Java applications, built on top of Jolokia, providing a set of plugins for management.
For a guide to getting started with HawtIO, refer to the HawtIO get started guide.
If using vanilla HawtIO, it can run as a WAR application within a web server, standalone as a JAR, or deployed alongside the JMS Bridge on the same host or on a separate host/local laptop.
Installation - Standalone JAR
Section titled “Installation - Standalone JAR”Download the latest version of the standalone JAR from the HawtIO Sonatype page.
Run it using:
java -Dhawtio.proxyAllowlist=JMS_BRIDGE_HOST_VM1,JMS_BRIDGE_HOST_VM2 -jar hawtio-app-2.17.7.jaror to run it in the background:
nohup java -Dhawtio.proxyAllowlist=JMS_BRIDGE_HOST_VM1,JMS_BRIDGE_HOST_VM2 -jar hawtio-app-2.17.7.jar 2>&1 < /dev/null > hawtio.log &Default port is 8080. To change the port for HawtIO, use:
java -jar hawtio-app-2.17.7.jar -p 9600Note: Replace
JMS_BRIDGE_HOST_VM1,JMS_BRIDGE_HOST_VM2with the actual hostnames of the JMS Bridge VMs that it’s connecting to.
Artemis Console
Section titled “Artemis Console”Artemis Console is a set of plugins built on top of HawtIO. It can be built and run standalone or as a WAR application within a web server.
Installation - Standalone WAR with Jetty
Section titled “Installation - Standalone WAR with Jetty”To run the Artemis Console as a standalone WAR application using the embedded Jetty Maven plugin, follow the steps below:
-
Download the Artemis Console WAR from the Artemis Console Maven page.
-
Place the below
pom.xmlin the same folder as the WAR file:<?xml version="1.0" encoding="UTF-8"?><project xmlns="http://maven.apache.org/POM/4.0.0" xmlns:xsi="http://www.w3.org/2001/XMLSchema-instance" xsi:schemaLocation="http://maven.apache.org/POM/4.0.0 http://maven.apache.org/maven-v4_0_0.xsd"><modelVersion>4.0.0</modelVersion><groupId>org.apache.activemq</groupId><artifactId>artemis-console-war</artifactId><version>2.36.0</version><packaging>war</packaging><name>ActiveMQ Artemis Console War</name><dependencies></dependencies><build><plugins><plugin><groupId>org.eclipse.jetty</groupId><artifactId>jetty-maven-plugin</artifactId><version>10.0.22</version><configuration><deployMode>EMBED</deployMode><scan>10</scan><contextHandlers><contextHandler implementation="org.eclipse.jetty.maven.plugin.MavenWebAppContext"><war>artemis-console-2.36.0.war</war><contextPath>/console</contextPath></contextHandler></contextHandlers><modules><module>jmx</module></modules><systemProperties><hawtio.authenticationEnabled>false</hawtio.authenticationEnabled><hawtio.disableProxy>false</hawtio.disableProxy><hawtio.proxyAllowlist>JMS_BRIDGE_VM1,JMS_BRIDGE_VM2</hawtio.proxyAllowlist></systemProperties></configuration></plugin></plugins></build></project> -
Make sure to update the
<war>artemis-console-2.36.0.war</war>to the correct filename (if versions differ) and<hawtio.proxyAllowlist>JMS_BRIDGE_VM1,JMS_BRIDGE_VM2</hawtio.proxyAllowlist>to the actual JMS Bridge VM hostnames, which generally match theJOLOKIA_HOSTenvironment variables set on those VMs. -
Then run
mvn jetty:runfrom the same directory where the WAR file andpom.xmlare located, to start the embedded Jetty server and deploy the WAR file. -
Navigate to
http://host:8080/consoleto open the Artemis Console. For example, if running on a local machine, that will behttp://localhost:8080/console.
Connect HawtIO / Artemis Console to Jolokia Endpoints on JMS Bridge VMs
Section titled “Connect HawtIO / Artemis Console to Jolokia Endpoints on JMS Bridge VMs”-
Add a New Connection
On the HawtIO / Artemis Console landing page, click onAdd Connectionand fill in the following details:- Name: JMS Bridge VM1 (or Master, etc.)
- Scheme: HTTP
- Host: JMS_BRIDGE_VM1 (replace with the actual host)
- Port: JOLOKIA_PORT (replace with the actual port)
- Path: /jolokia/
-
Example Connection
The following image illustrates how the connection details should look when filled in with example values. This connection is named jms-bridge, using the HTTP scheme, deployed locally on port 7777, and accessible at the path /jolokia.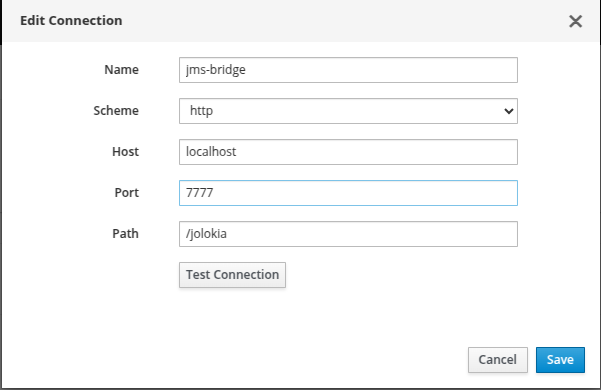
-
Verify the Connection
Ensure the connection is functioning correctly by testing it. -
Save the Configuration
Click on theAddbutton to save your configuration. -
Access the Monitoring Page
Once the connection is saved, click on the Connect button to open the JMS Bridge monitoring page.