Administering the Broker
HawtIO
Section titled “HawtIO”HawtIO is a modular web console for managing Java applications, built on top of Jolokia, providing a set of plugins for management.
For a guide to getting started with HawtIO, refer to the HawtIO get started guide.
HawtIO can be deployed as a WAR within a web server, run as a standalone JAR, or installed on the same or separate host as the JMS Bridge.
Installation - Standalone JAR
Section titled “Installation - Standalone JAR”Download the latest version of the standalone JAR from the HawtIO Sonatype page.
Run it using:
java -Dhawtio.proxyAllowlist=<<live-jms-bridge-host>>,<<backup-jms-bridge-host>> -jar hawtio-app-`<version>`.jaror to run it in the background:
nohup java -Dhawtio.proxyAllowlist=<<live-jms-bridge-host>>,<<backup-jms-bridge-host>> -jar hawtio-app-`<version>`.jar 2>&1 < /dev/null > hawtio.log &Default port is 8080. To change the port for HawtIO, use:
java -jar hawtio-app-<version>.jar -p <port>Note: Replace
<<live-jms-bridge-host>>,<<backup-jms-bridge-host>>with the actual hostnames of the JMS Bridge VMs that it’s connecting to.
Artemis Console
Section titled “Artemis Console”Artemis Console is a set of plugins built on top of HawtIO. It can be built and run standalone or as a WAR application within a web server.
Installation - Standalone WAR with Jetty
Section titled “Installation - Standalone WAR with Jetty”To run the Artemis Console as a standalone WAR application using the embedded Jetty Maven plugin, follow the steps below:
-
Download the Artemis Console WAR from the Artemis Console Maven page.
-
Place the below
pom.xmlin the same folder as the WAR file:<?xml version="1.0" encoding="UTF-8"?><project xmlns="http://maven.apache.org/POM/4.0.0" xmlns:xsi="http://www.w3.org/2001/XMLSchema-instance" xsi:schemaLocation="http://maven.apache.org/POM/4.0.0 http://maven.apache.org/maven-v4_0_0.xsd"><modelVersion>4.0.0</modelVersion><groupId>org.apache.activemq</groupId><artifactId>artemis-console-war</artifactId><version>2.36.0</version><packaging>war</packaging><name>ActiveMQ Artemis Console War</name><dependencies></dependencies><build><plugins><plugin><groupId>org.eclipse.jetty</groupId><artifactId>jetty-maven-plugin</artifactId><version>10.0.22</version><configuration><deployMode>EMBED</deployMode><scan>10</scan><contextHandlers><contextHandler implementation="org.eclipse.jetty.maven.plugin.MavenWebAppContext"><war>artemis-console-2.36.0.war</war><contextPath>/console</contextPath></contextHandler></contextHandlers><modules><module>jmx</module></modules><systemProperties><hawtio.authenticationEnabled>false</hawtio.authenticationEnabled><hawtio.disableProxy>false</hawtio.disableProxy><hawtio.proxyAllowlist>JMS_BRIDGE_VM1,JMS_BRIDGE_VM2</hawtio.proxyAllowlist></systemProperties></configuration></plugin></plugins></build></project> -
Ensure the
<war>path and thehawtio.proxyAllowlistentries are updated with the correct WAR filename and actual JMS Bridge hostnames (typically matching theJOLOKIA_HOSTenvironment variables set on those VMs).For example, if the WAR file is named
artemis-console-2.36.0.war, the<war>tag should be:<war>artemis-console-2.36.0.war</war> -
Then run
mvn jetty:runfrom the same directory where the WAR file andpom.xmlare located, to start the embedded Jetty server and deploy the WAR file. -
Navigate to
http://<observer-host>:8080/consoleto open the Artemis Console. For example, if running on a local machine, that will behttp://localhost:8080/console.
Connect HawtIO / Artemis Console to Jolokia Endpoints on JMS Bridge VMs
Section titled “Connect HawtIO / Artemis Console to Jolokia Endpoints on JMS Bridge VMs”-
Add a New Connection
On the HawtIO / Artemis Console landing page, click onAdd Connectionand fill in the following details:- Name: JMS Bridge VM1 (or Master, etc.)
- Scheme: HTTP
- Host: JMS_BRIDGE_VM1 (replace with the actual host)
- Port: JOLOKIA_PORT (replace with the actual port)
- Path: /jolokia
-
Example Connection
The following image illustrates how the connection details should look when filled in with example values. This connection is named jms-bridge, using the HTTP scheme, deployed locally on port 7777, and accessible at the path /jolokia.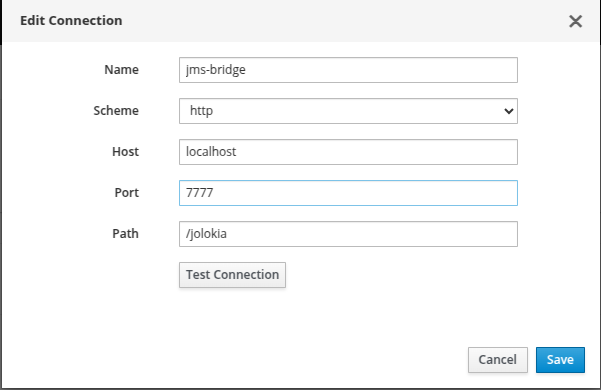
-
Verify the Connection
Ensure the connection is functioning correctly by testing it. -
Save the Configuration
Click on theAddbutton to save your configuration. -
Access the Monitoring Page
After saving, click Connect to open the JMS Bridge’s monitoring interface.